Tempering chocolate
Dark: dip @ 79 to 90/ Never hotter than 120
Milk chocolate: dip @ 79 to 88 / Never hotter 110
White: dip 82 to 84 never hotter than 105
Bring chocolate to 95 to 110 seed with unmelted pieces to bring down to right temperature
Work area should be 65 to 77
Check candy thermometer by putting it into boiling water. Water should boil at 212
If your thermometer boils 200 subtract 12
201 subtract 11
202 subtract 10
203 subtract 9
204 subtract 8
205 subtract 7
206 subtract 6
211 subtract 1
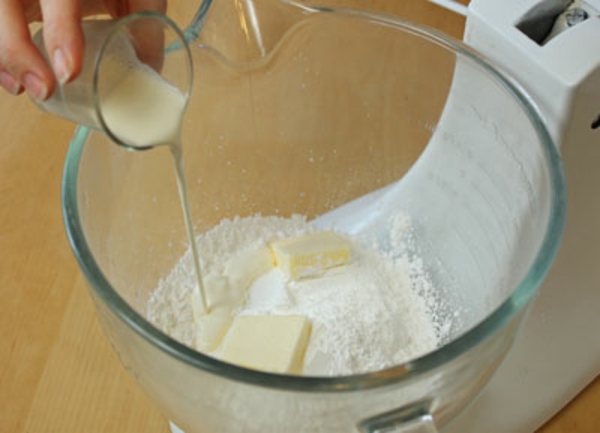
Fondant, Cream
1 cup whipping cream
1/2 cup milk
1/3 cup light corn syrup
4 cups sugar
1/4 teaspoon salt
1/4 tsp cream of tarter
1/2 cup mazetta or marshmallow cream.
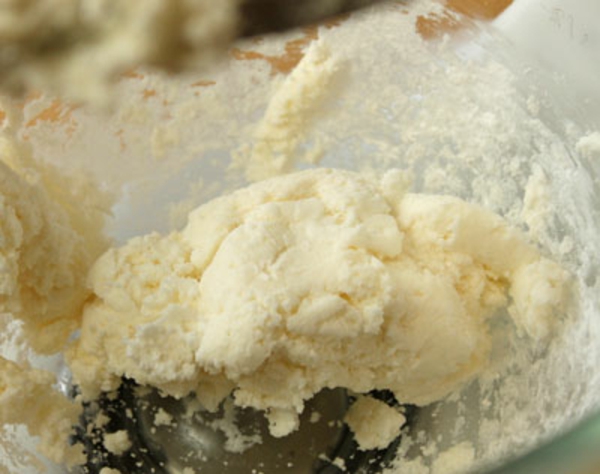
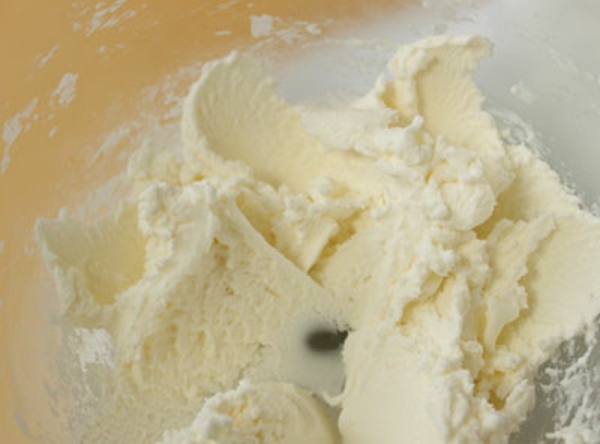
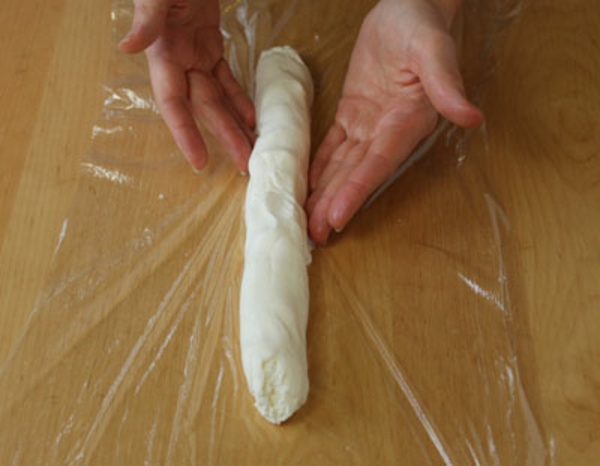
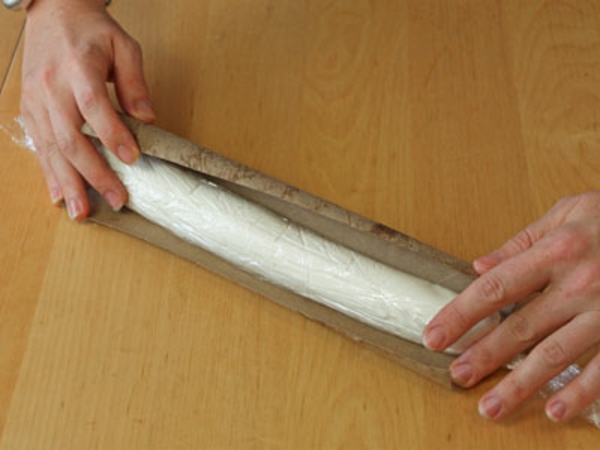
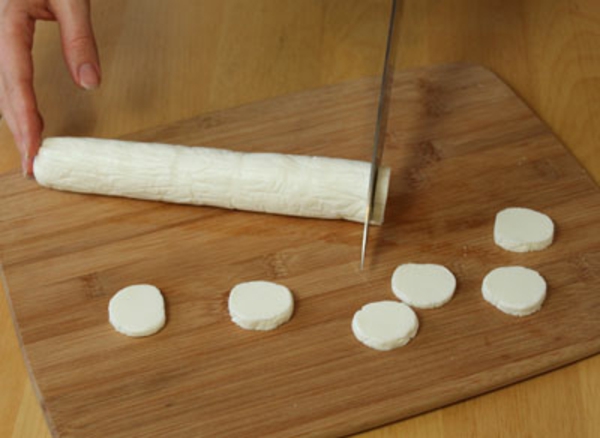
Cook to exactly 238 F. Remove from heat and without stirring or scraping pour into baking pan. Without excess movement place pan in fridge or cool on counter until bottom of pan no longer feels warm. Begin stirring fondant with a heavy wooden spoon. You don't have to stir rapidly just keep the mas moving. If desired 15 minutes. of stirring add 1/2 Mazzetti or marshmallow cream. If you are making only one flavor out of this batch you can add flavorings and nuts. Stir until fondant becomes very stiff and loses its gloss. At this point it has set up.
If the fondant is too stiff to handle break off small pieces and work them in your hands. This should cause it to soften. Or wrap the fondant in a plastic wrap and cover it with damp towel for 15 minutes. If it doesn't soften you will have to recook the fondant by adding 1 ½ cups water and bring it back to the right temperature. You have over cooked the fondant. If you have stirred for an hour and it still hasn't set up try letting it rest for a few minutes without stirring. If it doesn't set up it is undercooked and you will need to recook it.
Flavorings: These amounts are for a full batch. Reduce amount if you are separating it into several batches.
Vanilla Nut: 1 tablespoon vanilla and 1 cup chopped pecans or walnuts
Black walnut: 1 tablespoon vanilla, 1/4 teaspoon black walnut extract and I cup walnuts chopped
Cherry Creams: 2 teaspoons almond extract and 1 teaspoon rum extract
Cherry Nut: 2 teaspoon almond extract, 1 teaspoon rum extract, 1/2 cup chopped candied cherries (that have set over night on a paper towel so it is very dry) 1 cup pecans, walnuts or almonds.
Mint Creams: 1/2 teaspoon oil of peppermint or 2 teaspoons peppermint extract.
Lemon Creams: 1 tablespoon lemon extract, a small amount of yellow food coloring and 1/4 teaspoon citric acid, lemon zest
Orange Creams: 1 tablespoon orange extract, orange food coloring and 1/4 teaspoon citric acid, orange zest
Raspberry or Strawberry creams. 2 tablespoons raspberry or strawberry extract, 1/4 teaspoon lemon extract, pink or red food coloring and 1/4 teaspoon citric acid
Maple nut: 1/2 tablespoon maple extract chopped walnuts.
Maraschino Cream: 1 tsp maraschino flavoring, plus a little red coloring so the inside is pink, dipped in chocolate with peanuts chopped up in chocolate
Victorian Nut: 1 Tablespoon rum flavoring and wrap fondant around a Brazilian nut.
Mazetta (Homemade Marshmallow Cream
2 large egg whites, room temperature
3/4 cup light corn syrup
1/4 cup water
1/2 cup sugar
Using an electric mixer, beat egg whites in large bowl until stiff, set aside. In a 1-quart sauce pan combine corn syrup, water and sugar. Place over high heat and stir with a wooden spoon until mixture comes to a boil. If sugar crystals are present, wash down sides. Clip on candy thermometer and cook syrup to 242 F. Beating constantly with electric mixer, slowly pour hot syrup into egg whites, continue beating several minutes until mixture holds its shape. Use immediately or refrigerate in a covered container for up to 2 weeks. Makes enough for 3 batches of fondant. Thin mazetta with a little hot water for a tasty ice cream topping.
Chocolate Truffles (Bavarian Mints)
1 1/2 pounds (4 1/2 cups) melted chocolate
1 cup heavy cream
1 1/2 teaspoons vanilla
Oil of peppermint
Line an 8-inch square baking pan with plastic wrap set aside. Placed melted chocolate in medium size bowl. In a 1-quart saucepan, scald cream. Remove from heat and let cool for 5 minutes. Stir in vanilla. And peppermint. Beat chocolate with an electric mixer. Stop mixer and our cream all at once over chocolate. Continue beating cleaning sides and bottom of bowl several times with rubber scraper, until mixture is smooth and well blended this takes no more than 1 to 2 minutes. (If chocolate and cream look curdled or rough simply beat in more milk or cream. It does not need to be heated and my take anywhere from 2 tablespoons to 1/2 cup continue beating until the mixture is smooth) Pour into prepared pan and refrigerate 6 hours or until firm. Cut into 1-inch squares and dip in melted chocolate.
Dark Chocolate Key Lime Pie Truffles
Truffles
- 3/4 cup (180ml) heavy cream*
- zest of 2 limes
- 14 ounces (395g) white chocolate, coarsely chopped*
- 1 Tablespoon (15ml) fresh lime juice
- 2 Tablespoons (28g) unsalted butter, softened to room temperature and cut into 4 pieces
- Keylime extract oil
Topping
- 18 ounces (509g) bittersweet chocolate, coarsely chopped
- optional: 4 ounces (113g) white chocolate, coarsely chopped
- optional: a few green candy melts*
Instructions
- Heat the cream and lime zest in a small saucepan over medium heat. Stir it until the mixture barely comes to a boil. Remove from heat and allow the lime flavor to infuse the cream for 30 minutes.
- Meanwhile, place the chopped white chocolate into a medium heatproof bowl. Add the lime juice and butter to the bowl. Do not stir yet. Set aside.
- After 30 minutes, place the lime-infused cream back over heat until it barely begins simmering again. Remove from heat and strain it through a mesh sieve overtop the white chocolate, to remove the zest. Gently begin stirring the white chocolate mixture with a rubber spatula in one direction. Add key lime oil to taste.
Thin Mint Candy Bars
Crispy chocolate mint cookie layered with dark chocolate mint ganache, fully dipped in dark chocolate.EQUIPMENT
- 9 x 13" sheet pan
- parchment paper
- food processor
- 5 qt. planetary mixer
INGREDIENTS
Chocolate Shortbread Bottom
- 480 grams crushed chocolate wafer cookies
- 170 grams flour
- 150 grams sugar
- 2 grams salt
- 170 grams butter, cold and cut into small cubes
- 1 teaspoon peppermint extract
Chocolate for fat based barrier
- 150 grams chocolate or chocolate flavored candy melts
Chocolate Ganache
- 900 grams dark chocolate, chopped into pieces
- 382 grams heavy cream
- 135 grams corn syrup
- 0.5 teaspoon peppermint extract
Chocolate for Bottoming & Dipping
- 2 lbs dark chocolate, tempered or dark chocolate flavored candy wafers
INSTRUCTIONS
Chocolate Shortbread
- Heat oven to 350F.
- Line a 9X 13 sheet pan with parchment, leaving overhang on the long sides so you can easily lift the finished product out of the pan.
- Grind chocolate wafer cookies into a find dust.
- In the bowl of a stand mixer, combine chocolate cookies, flour, sugar, and salt. Turn mixer to low.
- Add in butter. Mix on medium until ingredients start to form a sandy dough. Add in peppermint extract. Mix for another minute.
- Press very firmly into the sheet pan. Cook for 20 minutes at 350F. Cool completely.
Fat based barrier
- Melt 150 grams of chocolate or chocolate flavored candy coating. Spread it in a thin layer on top of chocolate cookie.
Chocolate Ganache
- Heat heavy cream and corn syrup until scalded. This will take approx. 90 seconds in the microwave, but watch out for boil over. Add in peppermint extract to heavy cream and corn syrup after you've heated it.
- Pour hot cream mix over chopped dark chocolate. Let this sit for 1 minute without stirring.
- Slowly stir the chocolate and cream until it becomes uniform and forms ganache.
- Pour over chocolate cookie. Allow to set up until firm. You may put this in the fridge so it becomes firm, but you'll need it to come back to room temperature before cutting and dipping.
Cut, Bottom, and Dip
- Cut bars into desired size. I recommend 1" x 3".
- Melt and temper chocolate. Bottom bars by holding them between your thumb and forefinger and dipping the bottom into the chocolate. Run it along a spatula to remove excess chocolate. Place on parchment paper.
- Once bottoms have set up, run a knife along the edges of the bars for clean lines.
- Fully dip bars in chocolate.
- Bars will be good out of the refrigerator for 2.5-3 weeks.
Edra’s Butter Mint
3 cups sugar
1 cup water
1 cube butter
1/4 teaspoon cream of tartar
Bring water and butter to a slow boil on medium heat. Add sugar and stir in one direction until dissolved. Wipe pan clean with a wet paper towel to remove all crystals. Boil until candy thermometer reads exactly 255 F Pour onto a slab and add 3 drops of peppermint oil, or 1 teaspoon mint. Stretch as soon as you can possibly pick it up. Pull until you feel candy change and go dull. Pull out long and cut into pieces. Work fast. If you want the mints a color add the color you want with the water. Do not do this candy on a rainy or over cast day. If it fails you can add 1 cup of water and try again.
Peanut Brittle, Salted
2 cups sugar
1 cup light corn syrup
1/4 cup water
1 1/2 cans salted peanuts
3 tablespoons butter or margarine
1 teaspoon vanilla
2 teaspoons baking soda
Combine sugar, corn syrup and water in a 3-quart sauce pan mix well. Cook over medium heat stirring constantly until sugar dissolved. Continue cooking stirring frequently to prevent scorching, until mixture reaches 285 F. Remove from heat at once.
Stir in peanuts and butter and cook stirring constantly until mixture reaches 295 F. Remove from heat at once.
Add vanilla and soda stir to blend (work fast) Mixture will foam. Pour onto well buttered marble slab or 2 large buttered baking sheets. Spread out as thin as possible with spatula. As soon as brittle is cool enough so that you can work with it about 5 minutes turn it over and pull to stretch as thin as possible. When cool break in pieces. Makes about 2 pounds.
2 cups sugar
¾ cups water
¼ tsp soda
1 TBS vanilla
1 cup white Karo syrup
1 tsp salt
½ cube butter or margarine.
2 cups RAW Peanuts (See note)
First prepare your to be added later ingredients: cut the butter and have it read to add, measure the soda, salt and vanilla into separate small dishes. Put these ingredients aside. Also, butter two cookie sheets or a large sheet of aluminum foil
Combine sugar, water and Karo in a heavy saucepan; cook at high heat. When the syrup starts to thicken add peanuts. Stir constantly. The peanuts will begin to look pale beige, and as soon as the syrup changes from crystal to a pale yellow or straw color, remove the pan from the heat. Stir in the vanilla, salt and butter, and then add the soda. Stir until the mixture foams about 10 stirs. If you stir too much the mixture will be too brown.
Pour the mixture onto the buttered surface. After about two minutes, the edge will begin to stiffen. At this point, start working the candy around the edges pulling it out until the nuts are held together by only a thin sheet of crisp candy.
Break into pieces when cooled.
Note if you wish to use canned nuts instead of raw peanuts, simply add the nuts just before the syrup turns straw colored and reduce the added salt to ½ tsp.
Old Fashioned Fudge
Ingredients:
2 cups sugar
2/3 cup whole milk
2 tablespoons corn syrup
2 ounces unsweetened chocolate, coarsely chopped
¼ teaspoon salt
2 tablespoons butter
1 teaspoon vanilla
½ cup nuts (optional), coarsely chopped*
You will also need:
Parchment paper, candy thermometer, 2 or 3 quart saucepan, 9x5” loaf pan, thick spoon, spatula and about ½ teaspoon softened butter for buttering the panDirections:
Butter a 9x5” loaf pan and line it with parchment paper - then also butter the parchment paper.
Butter the sides (not the bottom) of a 2 or 3 quart saucepan.
Over medium heat, stir together the sugar, whole milk, corn syrup, chocolate and salt. Cook, stirring non-stop until the chocolate melts and the sugar dissolves.
Attach the candy thermometer to the pan (be careful not to let it touch the bottom of the pan).
Continue to cook, stirring occasionally, until the candy reaches 234°F on the thermometer.
Quickly remove the fudge from the heat and add the butter. Don’t stir the butter in - just let the it melt on top of the hot candy. Leave the candy thermometer and spoon in the pot.
Allow the fudge to cool (without stirring) to 120°F on the thermometer. (This takes about 45 minutes for me - although candy can be tricky and can take longer or shorter to cool - check the temperature periodically).
Once the fudge reaches 120°F - remove the thermometer and add the vanilla. Stir the vanilla in (with the melted butter that is already on top of the fudge). -Be careful, this can splash.
Beat the fudge vigorously and continuously until the candy is thick and looses its gloss - this take anywhere between 5 to 10 minutes.
Once the fudge thickens, looses it’s gloss and become difficult to stir, quickly stir in the nuts and spread the fudge into the prepared pan. Work fast as the fudge will now immediately harden.
Allow the fudge to cool. Using the parchment paper, lift the candy out of the pan and cut into small pieces to serve.
I store the fudge in a well-sealed container or zip lock bag.
*pistachios, dried cranberries, raisins or even coconut are also great stir-ins for the holidays.
Candied Almonds
Candied almonds are perfect for gifting but can also be enjoyed atop salads, yogurt, and more. They’re easy to make and call for just a few ingredients!Ingredients
- 1 large egg white
- 1 tablespoon water (15 ml)
- 1 teaspoon pure vanilla extract
- 1 pound raw almonds (464 grams)
- 1 cup granulated sugar (200 grams)
- 2 teaspoons ground cinnamon
- ½ teaspoon salt
Instructions
- Preheat the oven to 300°F (150°C). Line a large baking sheet with parchment paper and set aside.
- Add the egg white, water, and vanilla extract to a large mixing bowl and whisk together until well combined and frothy. Add the almonds and stir until they’re fully coated in the egg white mixture.
- In a separate mixing bowl, whisk together the sugar, cinnamon, and salt. Pour the cinnamon sugar mixture over the almonds and stir until all of the almonds are fully coated.
- Spread the almonds onto the prepared baking sheet in a single layer.
- Bake for 40 to 45 minutes, stirring every 15 minutes.
- Remove from the oven and allow to cool completely on the baking sheet.
Notes
Storage Instructions: Almonds may be stored in an airtight container at room temperature for up to two weeksLemon Creams
Ingredients:
2 cups sugar
1 cup heavy cream
1 tablespoon light corn syrup
1/8 teaspoon cream of tartar
1 teaspoon lemon extract
1/8 teaspoon salt
1 teaspoon softened butter
Yellow food color, optional
Favorite chocolate for dipping
In a medium saucepan, combine sugar, cream, cream of tartar and corn syrup. Mix well.
Cook over low heat until the sugar melts. Do not stir. Use a pastry brush and a little water to brush away any sugar on the sides of the pan.
Increase heat to medium high and bring to a boil. Boil, without stirring, until the mixture reaches 238° F.
Immediately transfer to the large stand mixer bowl. Add softened butter. Beat on medium low for about a minute. Increase speed to medium and beat until no longer shiny. (6 to 7 minutes)
Add the lemon extract, salt and food coloring. Mix to combine.
Place the filling in a lightly buttered dish and refrigerate until firm.
Roll filling into small balls. Refrigerate until ready to dip into chocolate.
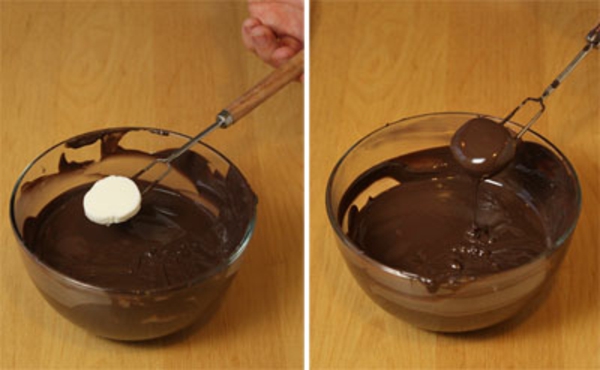
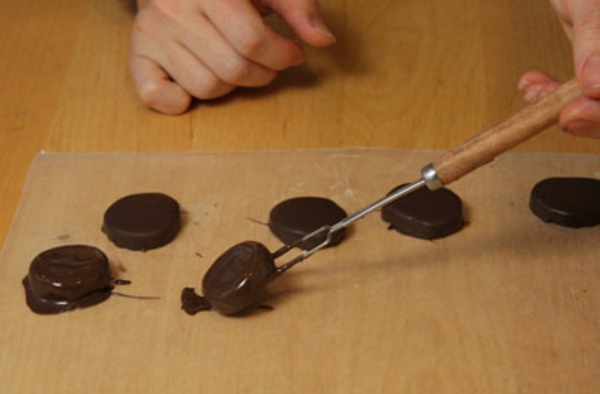
Over low heat, melt the chocolate in a double boiler. Dip each cream ball into the chocolate and let the excess chocolate drip off before placing on a wax paper covered baking sheet.
Decorate as desired with extra chocolate or nuts. Refrigerate until set.
Store in the refrigerator.
How To Melt Peter’s Caramel
Melting in the Microwave
The absolute easiest way to melt just a bit of caramel is in the microwave. Place the desired amount of caramel in a plastic or silicone microwave-safe bowl (we love these silicone bowls for so many things, but especially for quick and easy melting). Cook it on high for 30 seconds and then stir it. Put it back in the microwave, cook for another 30 seconds, and stir. Continue heating like this in small increments until the caramel has fully melted to the desired temperature. Note: always, always watch your caramel and stir gently between each microwaving interval to avoid scorching it. Also note, not all microwaves heat at the same temperature and you might have to adjust the power for more even melting.
Melting in the Oven
Are you looking to melt a ton of caramel (we are talking about one or two whole loaves)? Then the microwave may not be the best solution. Instead, we offer this low and slow method. It is the perfect, hands-off way to melt caramel if you want to get the process started and then walk away for a while. Place the caramel in your favorite enamel-covered Dutch oven (we absolutely love the Staub Cocotte 5 quart for half a block or one full block of caramel. We recommend a Staub Cocotte 7 quart only if you are trying to melt two blocks of caramel). Set the oven to 200℉, put the lid on the pot, and let the caramel melt for 90-120 minutes. No need to stand over the stove constantly checking and stirring.
Melting on the Stove Top
Another way to melt Peter’s Caramel is over a burner, though this method usually takes a little more care and attention. Just use a heavy-bottomed pot, turn the heat on low, and start melting. You will want to occasionally check on and stir the caramel to keep it evenly distributed and prevent burning along the bottom of the pot. If you don’t have a heavy-bottomed pot to use, you can always substitute it with a double-boiler. Set up the double-boiler as normal and add the caramel to the top bowl. Start with heat on low, stirring occasionally for the next 5-10 minutes, and only increase the temperature as needed to get the water to boil. This method will take a little longer, but will help prevent the caramel from burning and from cooling off too much while you are working with it.
Melting in the Crock Pot
So many people believe that turning a crock pot to the “warm” setting is the absolute easiest way to melt caramel. What they may not understand is that though most crock pots have three settings, a crock pot is either on or it is off – there is no other way to adjust to a specific temperature. And the warm setting on a crock pot is approximately 165℉. That is hotter than you might expect. So yes, you can technically melt the caramel in the crock pot, but you will need to act fast and stir, stir, stir. And once the caramel is melted, you will need to turn the crock pot off to keep it from burning.
In the Gygi Kitchen, we melt little bits of caramel in a silicone bowl in the microwave. If we are melting a lot of caramel (and we mean a lot when it comes to some of our classes), we always use the oven method for the perfect consistency every single time. These are some of the best practices for melting, whether you are preparing Peter’s Caramel to dip pretzels, make caramel apples, or drizzle caramel over popcorn. The other ways of melting caramel are fine, but require a little extra effort to make sure nothing scorches. What do you think? Are you ready to get melting?
Soft Caramel Chocolate Bonbons with Sylvain Leroy
INGREDIENTS
- 10 grams glucose syrup
- 185 grams sugar
- 185 grams heavy cream
- 110 grams Noel Morogoro 68% Dark Chocolate, melted
- 10 grams butter
INSTRUCTIONS
123456789Salted Caramel Molded Choclate
INGREDIENTS
- Ingredients
- 8 oz Peter’s Caramel
- 2 oz heavy cream
- 2 tsps Maldon sea salt
- Tempered couverture chocolate
INSTRUCTIONS
1234567Buttercream Centers


 (83 votes, average: 3.37 out of 5)
INGREDIENTS
- 1 cup heavy cream
- ½ cup milk
- 2/3 cup white Karo Syrup
- 4 ½ cup C&H pure cane sugar
- ¼ tsp salt
- 2/3 cup Marshmallow Crème
INSTRUCTIONS
1234NOTES
To make other flavors: Raspberry: process 1/2 cup of freeze-dried raspberries in a coffee grinder and sift out seeds using a fine strainer. Beat raspberry powder into the center mixture. Orange Cream: 1 ½ teaspoon Boyajian orange oil, and (if desired) zest of one orange, finely chopped. Lemon: 1 ½ teaspoon lemon oil, and zest of lemon, finely chopped. Chocolate Fudge: Add dark chocolate chunks to fondant as you begin to cook it, and nuts just as it begins to set in the beating process.
. . . . . . . . . . . . . . . . . . . . . . . . . . . . . . . . . . . . . . . . . . . . . . . . . . . . . . . . . . . . . . . . . . . . . . . . . . . . . . . . . . . . . . . . .
The magic of chocolate-covered buttercream centers is all in the type of chocolate you use. John recommends dipping with high-quality couverture chocolate. To learn how to use it correctly, read this post all about tempering couverture chocolate.
Almond Joy TrufflesIngredients- 14 oz. sweetened condensed milk
- 4 cups sweetened flaked coconut
- 4 cups powdered sugar
- 1 cup butter, softened
- 2 teaspoons vanilla
- dipping chocolate
- toasted almonds
Instructions- Mix milk, butter, coconut, vanilla, and sugar in a large mixing bowl.
- Shape into 1 inch balls and place on wax paper or heavy weight dipping sheets.
- Gently press one almond to the top of each coconut ball.
- Refrigerate for about an hour or until firm.
- Melt dipping chocolate according to package directions.
- Dip the coconut balls into the chocolate and set on wax paper or dipping sheet.
- Delicious Homemade Caramel

- Barb Alpern, a member of our King Arthur Flour bakers' support team, says about these caramels, "There was one recipe that my mother made each year during the holidays that was truly great. Caramels, in the ethos of my mother's farm upbringing, were a handmade gift, a special indulgence, and a test of culinary prowess." You'll find this candy to be all of these!
- 8 teaspoons (2 tablespoons + 2 teaspoons) vanilla extract
- 2 cups (1 pound) unsalted butter
- 4 cups (1 quart) half & half
- 2 cups (1 pint, 16 fluid ounces) light corn syrup*
- 4 cups granulated sugar
- 2 cups light brown sugar
- 2 teaspoons salt
- *See "tips," below.
- coarse flake sea salt for topping, optional; for salty caramels

Directions
- Butter two 8" x 8" or 10 1/2" x 6 1/2" pans. Measure the vanilla into a small container, and set it aside for later.
- Cut the butter into 1" chunks, to help it melt faster. Combine the cut-up butter, half & half, corn syrup, sugars, and salt in a heavy-bottom, 5- to 6-quart saucepan.
- Heat the mixture over medium-low heat until everything has melted, stirring constantly. Attach a candy thermometer to the side of the pan.
- Cook slowly, stirring constantly, until the mixture reaches 248°F, or until a small amount dropped in cold water forms a firm ball. As the mixture boils it will become thicker and thicker and the frothy bubbles will give way to a more blurpy bubble that resembles thick lava. This happens gradually, but you'll notice it around 230°F and higher. This is when you really have to pay attention and watch the temperature carefully, as it tends to move more quickly from 230°F up. The whole process will take about 2 hours.
- Remove the pan from the heat, and carefully stir in the vanilla; the mixture will bubble and boil.
- Quickly pour the caramel into the prepared pans. Don't add any residue from the pot into the pans; instead, scrape it into a separate container. Baker's treat!
- Wait 30 minutes, then sprinkle with coarse-flake sea salt, if desired.
- Cover the candy securely, and refrigerate.
- Remove the candy from the pan by loosening its edges with a knife or offset spatula, and banging the pan on a cutting board until the slab releases from the pan. Allow the candy to warm up a bit if it's hard, or it'll shatter when you bang the pan.
- Cut the caramels into squares, and wrap in waxed paper. Store in the refrigerator for longest shelf life. Wrapped caramels can also be frozen.
- Yield: about 10 dozen 1" caramels.
Tips from our bakers
- Don't be confused by the weight of the corn syrup. A standard-size bottle will say 16 fluid ounces on the label; but when you actually weigh the syrup on a scale, it'll weigh 22 ounces. Your easiest bet is simply to use one standard-size bottle.
(Lisa's Favorite)
3 C Sugar
2 C Butter (Always butter, never margarine or substitutes)

1/3 C water
Combine and cook in a heavy pan over heat. Bring to a boil and let cook approximately 4 minutes. Pour hot candy syrup through a strainer into another heavy duty pan and use a clean spoon. (This will eliminate sugar crystals that could ruin your candy)
Bring to a boil and turn heat down to low. Cook, stirring occasionally, until the candy reaches 290 Degrees on a candy thermometer. This is a little more than soft crack but not all the way to hard crack.
In the meantime, prepare a buttered Jelly Roll pan. After buttering the pan, put in whole or chopped roasted almonds.
Pour hot candy over the nuts and sprinkle with a bag of chocolate chips.
Let cool for 5 minutes.
Spread the melted chocolate chips over the candy to coat it.
With a pizza cutter, cut warm candy into bite size pieces.
Sprinkle more nuts over the warm, scored chocolate.
Let cool and enjoy! Keep cool and dry
Roast Almonds- Pour bag of whole almonds onto a pan. Put into a warm (300) oven and let cook approximately 30 minutes. They should be light brown inside, not brown or white.
The Big Three!!!
1 Use heavy pans
2 Use REAL butter
3 Strain hot syrup through a strainer
- 2 cups Peanut Butter
- 1/2 cup butter
- 1 teaspoon vanilla
- 2 cups powdered sugar
- 3 cups Rice Krispies
- Sprinkles
- 24 oz Chocolate Almond Bark
- 2 ounces paraffin wax or 2 ounces shorting
- Melt butter and while hot, stir in peanut butter.
- Mix well and add vanilla, powdered sugar and Rice Krispies. Chill 30 minutes.
- Use cookie scoop or 2 teaspoons to scoop and roll in with hands lightly until balls forms, not too much pressure or they'll start to come apart.
- Place on wax paper on a cold cookie sheet and chill 30 minutes to an hour.
- If using: paraffin shred on a box grater then add to the chocolate in a double boil and heat until melted and combined, (or you can melt in microwave safe bowl, 30 seconds at a time while stirring in between, being careful not to overheat).
- Dip balls into melted chocolate mixture with toothpick.
- Place on waxed paper and add sprinkles before they cool.

CHOCOLATE RASPBERRY STICKS
Ingredients
- 2 packets unflavored gelatin about 1 1/2 Tbsp
- 6 oz. box raspberry flavored Jello
- 1 cup sugar
- 3/4 cup hot water
- 1/2 cup cold water
- 1/2 tsp raspberry extract
- 12 oz melting chocolate or chocolate almond bark
Instructions
- Soften the gelatin in cold water and set aside.
- Combine sugar, raspberry Jello and hot water, stir until dissolved. Bring to a boil in a saucepan over medium-high heat. Add the gelatin mixture and slowly boil on medium-low heat for 20 minutes. Remove from heat and add the remaining ingredients.
- Pour into well-greased candy molds well-greased mini loaf pans. Let stand over night and then dip into melted chocolate.
- Place the chocolate in a glass bowl and microwave for 45 seconds, then stir. Continue to microwave in 15 second intervals, stirring in between each interval until the chocolate is completely melted. I also drizzled a little white chocolate on top just for fun. Enjoy!
Makes about 70 balls.
 Calories: 155 kcal
- 1/2 cup salted butter (1 stick)
- 2 cup granulated sugar
- 1 cup light karo syrup
- 12 ounce can evaporated milk
- 1/2 teaspoon vanilla extract
- 40 Pretzel Rods
- 16 ounce Ghirardelli semi-sweet chocolate baking bars , (I buy four 4 oz bars)
- Prepare two large baking sheets lined with parchment paper.
- Add butter, sugar, and karo syrup to a large heavy-bottom saucepan over medium heat. Stir over medium heat until mixture begins to boil, about 5-10 minutes.
- VERY slowly add the evaporated milk, taking about 12-15 minutes to slowly add it, while stirring constantly. You want to make sure the mixture maintains a constant boil, otherwise your caramel can curdle.
- Stir the mixture constantly, scraping the sides occasionally until it reaches the soft ball stage (about 235 degrees, if using a candy thermometer). It takes patience and time, but it's sooo worth it!
- I don't always trust or rely on a candy thermometer--I like to test it the old fashioned way. Drop a spoonful of hot caramel sauce into a cup of ice water and mold it with your fingers into a ball. When ready it will feel pliable and should be sturdy enough to mold in your hands, in the ice water. If you're not sure if it's too soft, err on the side of cooking a few extra minutes.
- Once you reach 235 degrees F / or the soft ball stage, remove from heat. Stir in vanilla.
- Dip Pretzel Rods in caramel. I use a spoon to scoop the sauce onto the pretzels and turn them as I go. Allow excess sauce to drip off and place the dipped pretzels on a parchment lined baking sheet.
- After the caramel sets and cools some of it may pool at the base of the pretzel, causing the bottom to be flat. Use your hands to mold the caramel back around the rod (or just roll the rod gently on the parchment paper to smooth it around).
- Melt chocolate in a microwave-safe bowl, on half power, stirring every 30 second, until smooth.
- Pour the chocolate into a tall glass. Dip the caramel-coated pretzels in melted chocolate. You can use a spoon or spatula to help smooth the chocolate up and around if you need it.
- Lay the dipped pretzels on a parchment lined sheet. At this point you could add other toppings like mini chocolate chips, sprinkles, crushed heath bar etc.
- If any chocolate pools at the base of the pretzels as they set you could easily cut it off with a knife, if you want it to look prettier..
- You can store the pretzels in the fridge in a covered container, if you want. Let the pretzels sit at room temperature for 5-10 minutes before eating.
- Tips for making, storing, and gifting these pretzel rods are listed in the post above!
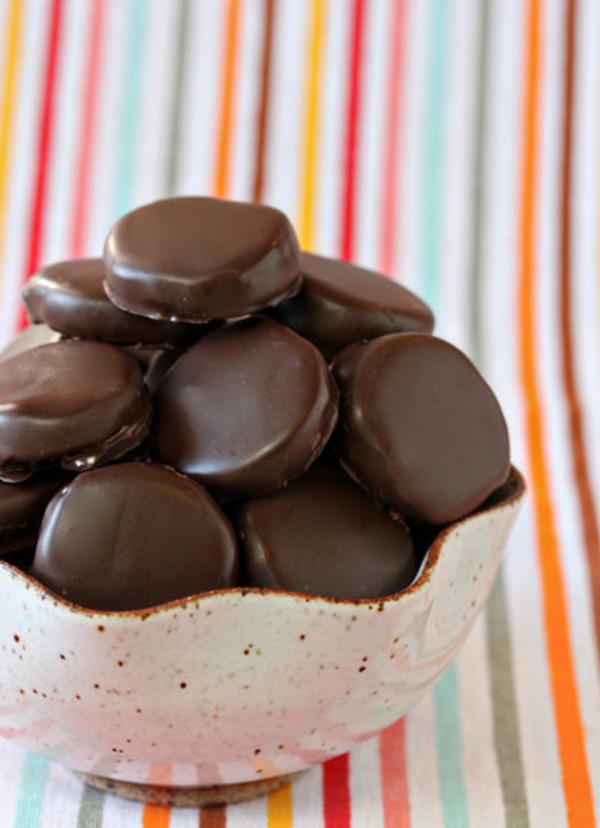
Homemade Peppermint Patties
Prep time: 30 min
Ingredients
- 2 1/4 cups powdered sugar
- 2 tbsp softened butter
- 2 tsp peppermint extract
- 2 tbsp cream
- 12 oz Mellting Chocolate Wafers
HOW TO MAKE THESE CHOCOLATE ORANGE TRUFFLES:
Cover the bowl with plastic wrap and place in the fridge for about 45 minutes or until mixture begins to thicken.
Chocolate-Covered Peanut Butter Fudge

Ingredients
- 1½ cups granulated white sugar
- 7 oz (1 jar) marshmallow creme/fluff
- 2/3 cup evaporated milk
- 4 Tbsp unsalted butter, cubed
- 12 oz (1 bag) peanut butter chips
- 1/4 cup creamy peanut butter
- 1 tsp vanilla extract
- 16 oz (1 package) chocolate Candiquik or almond bark
Instructions
- Line a 8x8 or 9x9 square baking pan with foil or parchment, then lightly grease the foil or parchment; set aside.
- In a large heavy bottomed saucepan, combine the granulated sugar, marshmallow fluff, evaporated milk and cubed butter over medium heat. Bring to a boil, and cook, stirring constantly, for 5 minutes. Remove from the heat and stir in the peanut butter chips, peanut butter, and vanilla extract until combined and melted together.
- Pour the fudge into the prepared pan and smooth into an even layer. Let stand for about 10-20 minutes to cool down some, then place in the refrigerator to chill and set, about 2 hours. Once chilled and set, remove from the pan and cut into squares, trimming off any rough edges with a sharp knife. Since this fudge is sticky, I recommend wetting your knife with HOT water, then wiping the water off and using the hot knife to cut, repeating after each cut. I got about 25 pieces of fudge, doing 5 rows by 5 rows (and trimming the edges). Place the squares of fudge onto a baking sheet lined with parchment and freeze until firm, about 20 minutes.
- Melt your candy coating according to package directions, or until smooth. Use a fork to lower a piece of semi-frozen fudge into the candy coating and toss to coat. Allow excess chocolate coating to drip off of the fork, then carefully slide the coated fudge piece back onto the parchment-lined baking sheet. Repeat with coating the remaining fudge pieces. With any leftover chocolate, drizzle over the set chocolate fudge pieces, or top with sprinkles while coating is still wet.
Notes
I used Reese's brand peanut butter chips for this recipe, but any peanut butter chips should do. Fudge keeps in the fridge best for about 4 days, but can be stored covered at room temperature for about 2-3 days.Buttercream Truffles
These Buttercream Frosting Truffles taste like a birthday party in your mouth - just without the cake! For serious frosting lovers only, these truffles are made with American buttercream for a sinfully sweet and ultra indulgent no-bake treat!
Ingredients
- 3/4 cup (1 & 1/2 sticks) unsalted butter, softened to room temperature
- 1 Tbsp vanilla extract
- Pinch salt
- 4 cups confectioners' sugar
- 4 Tbsp heavy whipping cream or whole milk
- 2 pkg dark chocolate candy coating/melting wafers such as Ghirardelli
- Rainbow sprinkles, for garnish
Instructions
- Line a rimmed baking sheet with parchment paper or foil; set aside.
- In the bowl of a stand mixer, cream together the butter and vanilla extract (or any other extract if using) and beat with the paddle attachment until creamy and smooth, about 1 minute. Add in 2 cups of the confectioners' sugar, the pinch of salt and 2 Tbsp of the heavy cream and mix on low speed until fluffy. Scrape down the bottom and sides of the bowl and add in the remaining 2 cups confectioners' sugar and 2 Tbsp heavy whipping cream and mix until stiff yet creamy and fluffy. Refrigerate for 1 hour to chill.
- Using a Tablespoon-size cookie dough scoop, scoop out Tablespoon-size balls of frosting and place onto the lined baking sheet. Freeze for at least 30 minutes or until solid and firm. Once firm, melt the dark chocolate candy coating according to package directions, or until smooth.
- Place a frosting truffle into the melted dark chocolate and toss to coat with a fork. Allow excess to drip off of the fork and return the coated truffle to the lined baking sheet; immediately top with sprinkles. Repeat with remaining truffles. Allow chocolate coating to set (should set very fast since the truffles are cold) before packaging or serving. Can be stored in the fridge about 1 week or freezer about 1 month.
Notes
If using other extracts, add them in when you'd add in the vanilla extract.If using citrus zests, add them in with the vanilla extract.If using freeze-dried fruit powder, add them in with the confectioners' sugar.If using finely shredded coconut, miniature chocolate chips, finely diced nuts or sprinkles, add them in with the last batch of confectioners' sugar.Christmas Pretzel Hugs
These Christmas Pretzel Hugs are to die for! Super simple to make, can be made with kiddos and SO tasty with a delightful sweet and salty flavor.
Ingredients
- 50-70 snap pretzel grids (the square pretzels)
- 50-70 Hershey's Hugs candies, unwrapped
- 50-70 Christmas M&M's
Instructions
- Preheat the oven to 200° degrees F. Line a rimmed baking sheet with parchment paper or foil to make cleanup a breeze. Arrange 50-70 pretzels (depending on how many you want - could be less than this if desired) in a single, even layer, removing any chipped or broken pretzels.
- Place a Hershey's Hug candy in the center of each pretzel. Bake for 3-4 minutes or until the Hugs candies look shiny and soft but have not melted.
- Remove from the oven and immediately press a holiday M&M candy on top of the Hug to slightly spread out the Hug onto the pretzel. Allow the pretzels to cool and the chocolate to reharden, about 30 minutes, before packaging or storing.
Notes
This recipe has broad measurements because you can honestly make as much or as little as you want. I found one standard bag of Hershey's Hugs candies yields about 60 or so Hugs, so I got about 60 pretzel hugs total. However, you can double, halve, or triple this recipe accordingly.Can't find Hugs? Feel free to use the seasonal or different Hershey's Kisses flavors, such as cookies & cream, sugar cookie, or caramel filled.Rolo Ritz Cracker Sandwich Cookies
These Rolo Ritz Cracker Sandwich Cookies are insanely delicious and SO simple to make! Buttery, crispy, sweet, salty and filled with a luscious caramel center, these cookies come together quickly and are great for gifting!
Ingredients
- 60-66 Ritz crackers (about 2 sleeves)
- 30-33 Rolo candies unwrapped
- 16 oz (1 lb) chocolate candy coating or almond bark
- Holiday sprinkles
- Flaky sea salt
Instructions
- Preheat oven to 200° degrees F. Line a large rimmed baking sheet with parchment paper or foil. Place 30-33 (or one sleeve's worth) of Ritz crackers upside down onto the baking sheet. Top each Ritz cracker with an unwrapped Rolo candy.
- Bake for about 3 minutes or until the Rolo's look glossy but have retained their shape. Immediately press the remaining sleeve's worth of Ritz crackers on top of the softened Rolos to create a sandwich. Allow the sandwich cookies to set briefly, about 20 minutes.
- Melt the chocolate candy coating according to package directions. Using a fork, dip each sandwich cookie one at a time into the candy coating, coating all sides. Allow excess to drip off of the fork and return to the baking sheet. Sprinkle the still-wet surface with flaky sea salt or holiday sprinkles. Allow the chocolate to harden and set, about 10 minutes.
No-Bake Turtle Wafer Cookies
These No-Bake Turtle Wafer Cookies are super delicious, totally easy and great for gifting! You won't believe how simple they are to make, yet how tasty they end up being!
Ingredients
- One box Nilla Wafers (you can make the entire box for about 60 cookies or make as little as you need)
- One (11 oz) bag caramel bits
- 2 Tbsp heavy cream or milk
- One (10 oz) bag chocolate melting wafers or almond bark such as Ghirardelli Milk Chocolate Melting Wafers
- 2/3 cup semi-finely chopped pecans
Instructions
- Line a large baking sheet with parchment paper or silicone liners. Arrange as many Nilla Wafers as you want to make in an even layer - up to 60 or so that are in the package. Set aside.
- In a medium microwaveable bowl, combine the caramel bits and heavy cream and microwave on HIGH power for 30 seconds. Stir, and microwave another 30 seconds. Stir once more and heat for another 15-30 seconds until completely melted and smooth.
- Spoon a teaspoon or two of the caramel onto the tops of each cookie. It's okay if the caramel drips and pools on the sides of the cookie. Allow caramel to set briefly, about 10 minutes. While caramel sets, prepare your chocolate wafers according to package directions. Spoon about a teaspoon or two of chocolate on top of the caramel cookies. Immediately sprinkle with the chopped pecans.
- Allow chocolate to harden and set before stacking, storing or serving.
Notes
This recipe makes as much or as little as you'd like. Just make sure to adjust it to your preferences. As written, it makes the entire box of Nilla Wafers, but if you only need half of that, halve the rest of the ingredients.Peanut Butter Balls
1/2 c Butter
1c-18 oz Peanut butter
3c Rice Krispies
3 1/4 c Powder Sugar
Milk Chocolate for dipping
Mix Butter and Peanut Butter til melted
Mix Rice Krispies, Powder sugar in separate bowl
Pour Butter mixture in Sugar mixture make into small balls. Cook in Fridge- Dip in Melted Chocolate
S'mores Dipped Strawberries
These S'mores Dipped Strawberries are delicious and such a fun twist on a summertime favorite! Juicy, ripe, fresh strawberries are dipped in layers of s'mores flavors for the ultimate treat!
Ingredients
- 8-10 large fresh strawberries, washed and patted dry
- 3 cups miniature marshmallows
- 1½ cups dark chocolate melting wafers such as Ghirardelli brand
- 1/2 cup graham cracker crumbs
Instructions
- Line a rimmed baking sheet with parchment paper. Grease the parchment paper with cooking spray; set aside.
- Add the miniature marshmallows to a medium microwaveable bowl. Microwave on HIGH power for 30 seconds. Marshmallows will look puffy. Stir until melted and gooey. Working very quickly, dip each strawberry about 3/4 of the way into the marshmallow goo mixture. The key is to work fast as the marshmallow goo mixture sets fast! If needed, microwave the marshmallow mixture for another 5 seconds to reheat. Once strawberries have been dipped in the marshmallow mixture, refrigerate for about 10 minutes to set.
- After the marshmallow layer has set, melt the chocolate candy coating according to package directions, or until smooth. Dip each strawberry about 2/3 of the way into the dark chocolate and allow any excess to drip off. Return to the baking sheet and immediately sprinkle with a generous amount of graham cracker crumbs. Allow chocolate to harden on the strawberries before serving. Serve immediately.
Notes
You can definitely make this in larger batches, but I would recommend making the melted marshmallows in smaller batches due to the fact that it hardens so fast.Super Easy Key Lime Pie Bars
These Key Lime Pie Bars could not be easier to whip up and taste AMAZING and authentic! Tart, tangy, sweet and gooey with bright and zesty key lime flavor!
Ingredients
For the Graham Cracker Crust:
- 1½ cups graham cracker crumbs
- 1/3 cup granulated white sugar
- 1/3 cup melted unsalted butter
For the Key Lime Filling:
- 4 oz full-fat cream cheese, softened
- 28 oz (Two 14-oz cans) sweetened condensed milk
- 3/4 cup key lime juice I like Nellie and Joe's
- Zest of 2 limes
- Fresh whipped cream, for garnish optional but recommended
Instructions
- Preheat oven to 350° degrees F. Line an 8x8 square light metal baking pan with foil or parchment, extending the sides of the foil over the edges of the pan. Spray the foil with cooking spray and set aside.
- For the crust: In a medium bowl, combine the graham cracker crumbs, melted butter and granulated sugar until moistened and combined. Pour the moistened crumbs into the prepared pan and press into an even layer with a flat bottomed measuring cup or your hands. Bake for 10 minutes. Remove from oven but keep oven on. Allow crust to cool briefly, about 10 minutes.
- For the filling: Beat the cream cheese in a medium bowl with a handheld electric mixer until smooth. Add in the sweetened condensed milk and mix well, followed by the key lime juice and zest and mix on low speed until fully incorporated. Pour the filling evenly over the partially cooled crust and smooth carefully into an even layer.
- Bake for an additional 10 minutes, then allow the bars to cool for about 30 minutes. Refrigerate for at least 3-4 hours, or overnight, before cutting into bars to serve. Before serving, I like to top with freshly whipped cream and toasted coconut or fresh lime zest.
Notes
This recipe was tested with Nellie and Joe's key lime juice which you can find at most grocery stores across America in the juice aisle. It is by far the easiest way to get authentic key lime flavor without juicing a ton of teeny tiny fresh key limes.
Best Ever Orange BarsThese Best Ever Orange Bars truly are the BEST! Juicy, creamy, sweet, gooey and SO amazing with pure orange flavor in every mouthwatering bite!
Ingredients
For the Crust:
- 1½ cups graham cracker crumbs
- 1/3 cup melted unsalted butter
- 1/3 cup granulated white sugar
For the Filling:
- 4 oz cream cheese, softened to room temperature
- 28 oz sweetened condensed milk (two 14-oz cans)
- 3/4 cup orange juice
- Zest of one medium orange
- 1 tsp pure orange extract optional but recommended
- Whipped cream for garnish, optional but recommended
Instructions
- Preheat oven to 350° degrees F. Line an 8x8 square light metal baking pan with foil, extending the sides of the foil over the edges of the pan. Spray the foil liberally with cooking spray; set aside.
- In a medium bowl, stir together the graham cracker crumbs, melted butter and granulated sugar until moistened. Pour the crust into the prepared baking dish and press the crust into an even, compact layer. Bake for 10 minutes. Remove from the oven but keep oven on. Cool for about 5 minutes.
- For the filling: In a medium bowl, beat the cream cheese with a handheld electric mixer until smooth. Add in the sweetened condensed milk and mix well until smooth. Add in the orange juice, orange zest and orange extract, if using, and mix until fully combined. Pour the filling into the prepared crust and smooth out the top.
- Bake for an additional 10-20 minutes or until the filling is just about set. If it jiggles slightly, that's okay, but it should not be sloshing around in the pan. I found mine to bake closer to the 20 minute mark, but yours may take around the 10 minute mark which explains the large baking time difference. If needed, continue baking past 20 minute mark in 5 minute increments. I think because orange juice tends to be a touch more watery, it causes the filling to take longer. Cool the bars for about 30 minutes, then refrigerate for at least 3-4 hours to cool, firm and set. Just before cutting into squares, garnish with fresh whipped cream, if desired. Store any remaining bars in the refrigerator.
Notes
There is a larger baking time difference in the orange bars versus the original key lime bar recipe. The orange bars take around 10-20 minutes to bake. Why? Sometimes I find orange juice is more watery than key lime juice, which could cause the filling to take longer to bake and set up in the oven. My filling took closer to 20 minutes in the oven to set up, but yours may take closer to 10. Check at the 10 minute mark and increase in 5 minute increments until filling is just about set. If it jiggles slightly, that's okay, but it should not be sloshing around in the pan. If you go past the 20 minute mark, that's okay, too. Again, it shouldn't be sloshing around. You want it slightly jiggly and just about set.White Chocolate Nutter Butter Magic Bars
These White Chocolate Nutter Butter Magic Bars are seriously amazing! Sweet and salty perfection with creamy peanut butter and sweet white chocolate in a soft and chewy bar!
Ingredients
- One box yellow cake mix do NOT prepare the cake mix!
- 1 large egg
- 1/2 cup (1 stick) unsalted butter, melted
- 1 cup white chocolate chips
- 1 cup peanut butter chips
- 10.5 oz bag ("Share" size) Reese's white chocolate PB cups, roughly chopped
- 2 cups roughly chopped Nutter Butter cookies I used Nutter Butter bites and halved them
- 14 oz (1 small can) sweetened condensed milk
Instructions
- Preheat oven to 350° degrees F. Line a 9x13 light metal rectangular baking pan with foil, extending the sides of the foil over the edges of the pan. Spray the foil liberally with cooking spray; set aside.
- In a large bowl, combine the cake mix, egg and melted butter until a soft dough comes together. Press the dough into the prepared pan in an even layer. Bake for 12 minutes until barely set. Remove from oven, but keep oven on.
- Immediately top the crust with the white chocolate chips, peanut butter chips, chopped white chocolate Reese's peanut butter cups, and chopped Nutter Butter cookies evenly. Drizzle the sweetened condensed milk evenly over the top of the bars. Return to the oven and continue to bake for 18-20 minutes or until center appears set and the edges are bubbly.
- Cool completely, about 2 hours, or until set, before cutting into bars.


No comments:
Post a Comment